Showing posts with label maya. Show all posts

3D Project: Clothed model project part I

No Comments »

Very quick post showing the starts to a new project I'm working on. This is based on the current on demand workshop I bought from Zbrushworkshops. You can find the specific course here.

After a very quick play last week trying to get used to Maya again I managed to create a rough jacket and got it working in Zbrush (see below). I decided to start again from the start with a project in mind.


Above: Note with single facing geometry the inside will appear invisible. I filled in the collars fully which explains why they are visible. If you do this in your 3d program by duplicating and scaling remember you may need to reverse the normals!

The project I have chosen is to do a 3d representation of Inquisitor Eisenhorn from the novels/40k universe. The reason for this is the complex clothing (in the concept art by Clint Langley he wears 3 layers of jackets!) as well as plenty of smaller items on the concept art which have their own techniques.

I've started blocking out the pieces as the workshop recommends (I'm using Maya. not Softimage but the principles in all 3D packages should be roughly the same).


Above: I created a custom toolbar with my own options I use constantly for modelling in this way. To add icons to the custom palette ctrl+shift the option/tool you want to use. To get rid of them from the custom palette just hold middleclick and and drag to the recycle bin. I'll explain what I put up there myself if it is helpful to those going through the Zbrushworkshop and are using Maya rather than XSI. 

 As I'm not going to be using it for game art I've been doing some tests with using just flat geometry (instead of thickening/ adding geometry in Maya for the inside of each bit of clothing). Once imported in to Zbrush and subdivided provided it is all one polygroup you can use Panel loops with a thickness to create the inside/ clothing thickness.

Here is the first test using the collar piece (the head is just an old head bust I did just to test scale). Aside from the bevel which I need to change I was happy with the result.


The plan is to get this fully finished by Christmas although depends on work schedule. Next weekend I should get the boots and inner+main jacket. Then after importing will pose, then re-import in to Maya to roughly model the outer jacket.

Sculptris: Torso Study

No Comments »

Base mesh done in Maya based on a quick tutorial found in the book 'Zbrush Digital Sculpting Human Anatomy' by Scott Spencer - You can find it on Amazon here

The book itself is great for learning how to sculpt anatomy (I have no real traditional training so learning as I go). Although it is based around using Zbrush the same sculpture lines /techniques still basically apply.

I just started working on the torso for a heroic/comic style character and kept proportions in mind.


With a base mesh done and a basic form created you can just start tweaking with the grab tool to make quick prototypes for other body shapes. (Click images for larger view)


The preview render style I am showing here is just a few different materials (still in sculpt mode) rendered out and layered in Photoshop. I then make a smart layer and duplicate that, one of the layers I apply a cutout filter (then choose soft light as the layer type) for a hint of cel shaded/hand painted shadows then the other I created a very think glowing edge using Filters> glowing edges. You then switch the layer type to linear dodge(add) or Screen for the desired effect.

Have a play around yourself anyway, enjoy!

Brand X Lighting WIP

2 Comments »

Scene/model taken from the 3drender.com lighting challenges.
This is still a WIP - caustics not yet done and could do with a few more lights.

Render time (on my very slow laptop 2min5sec)

Here's a view of the rig so far, 1 directional light and using Final Gather with some image based lighting, also using the white planes (primary visibility and emit/receive shadows off) to add a little more to the reflections/ lighting (appearing more like studio work).


I also had a play with some Lens/output shaders and gave the mia_exposure_photographic shader a go with these settings;

It produced these results which I kinda like, with some more tweaking I think it will be a pretty fun shader to use - it added 1 second to render time.

and after amb_occlusion pass + some colour balance/ noise in PS;


(model by Anthony Thomas)

Lighting Studies '09

No Comments »

These were from the Lighting and Rendering with Mental Ray course I went on last year. The course ran by Jeremy Birn (Lighting Artist, Pixar) was great for further study in to lighting/rendering with 3d packages (Maya used for these). I'm continuing studies in lighting by doing the 3D Lighting Challenges found here


I'd recommend the course for anyone interested in Lighting or Rendering, the basic techniques can be used in any package really and it teaches how to use lights well and more importantly efficiently (getting good results without necessarily the need for advanced rendering options like Global Illumination).

Particle Studies

No Comments »

Further studies in particle work (Maya)


playblasts and render tests can be found here http://www.youtube.com/user/scutteh

Sculptris Tests

No Comments »

Sculptris is currently a free to use 3d sculpting program (currently in Alpha stage). It is slightly more basic and raw compared to the big sculpting tools (mudbox/Zbrush) but it still has a great charm and excellent ease of use.


Here are a few tests done with it (using the default sphere as the starting point).

Above: test/wip work of a Magneto/ Raiden character (head would be covered with helmet)
Below: A goblin


Above: WIP of a Kingpin style character
Below: Test Render in Maya with bump and skin shader applied


I found the program really easy to use and a nice start for those not used to importing objects in to Maya for a render. (I used a modified version of MayaSSS Fast Skin Shader as a base for the skin with my texture painted colours as bump added to it, then a simple lighting rig for the images). The downside is it's quite a bit harder to get a refined model such as in zbrush and poly count can be quite high (although the reduce brush does an excellent job of lowering poly count).

This program is perfect for lunch time doodles at work or test ideas which can then be developed in more powerful software combinations. Give it a go!


Flame Studies

No Comments »

This is progress from working through the flame section of the Maya Studio Projects: Dynamics book;


I'm kind of happy with it, still working through the burning building project while also working out how to utilise the skills learned in the book in to my own work, possible a character walking through a dungeon with a torth or similar.

Here's progress on the house section;


My laptop is on it's last legs so I'm not sure it will handle the higher res (currently the higher one seen at the bottom is at 80 - 90 and 70 compared to the books suggested 160+. I'll work out a proper ratio tomorrow and raise it accordingly from the low 40-50 and 30 suggested resulution values.

Dynamics Projects

No Comments »

Just going through a few new dynamics books for Maya currently to learn more MEL scripting and Expressions. My first test is a of a plinian eruption. While the speed isn't correct here I'm quite happy with the result currently.


The animation itself runs too fast, simply as it was just a test to see if the plume went up in the air. Render time roughly 2 hours for 60 frames. the sequence was originally meant for PAL but I rendered the final animation at 15fps just so it was a little slower/more like how the full animation should be.


Sketch and current work

No Comments »

A little more face sketching.


Also been working on some Dynamics in Maya and will be buying 2 more books when I'm back from a short trip back home. Dynamics/particles is pretty much what I spent most of my final year doing and also enjoyed it the most throughout university.


While most of my work was done in XSI/pflow I spent a lot of time using realflow and Fumefx. I'm currently moving the skills learned from that to Maya/MEL scripting. I've set myself some pretty simple effects tasks to do for now (smoke,fire,explosion,snow) just as starting points while I get used to the expressions editor and such.

Back to Boujou

No Comments »

Long time no post. I've been finishing the Lighting and Rendering in Mental Ray course. It's been really good and I've learned a lot of techniques and tips for not only making my lighting/rendering better but also more efficient. One of the most important things I've done to improve is to no longer just 'guess' lighting work. It may take a little longer at first to take time to set up your key lights etc but taking time on small changes instead of adding new lights to overwrite errors in the scene is worthwhile in the long run.

Since finishing the course I've been planning on how to use it, as well as starting a redesign for my website. I updated my current CV/Resume (which can be found to the right of this page). My new website will be easy to use and just have simple links to gallery, videos, CV and then the news can be updated from here.

Finally I've been dusting off Boujou and doing some motionmatching. As most starting 3d jobs within VFX/film require motionmatching skills I thought I'd pick it back up and start to test footage/ scenes to bring me up to scratch again (I last used it last year while at university).


I have a friend at work who has a good camera and did a favor and shot the above footage for me. While it's still a little slippy I'd say I have more of an understanding of the program now and setting the co-ordinates/scene geometry made a lot more sense than previous tests. I'm going to work on it till there are no slippages and then concentrate on shadows/lighting etc.

I did come across a few problems within Boujou and Maya, looking on various forums I found the solution to some of it. Here are a few tips if you are unable to find them.

The image plane sequence may not load in Maya, or if it does it may only be freezing on frame 1. If this is the case you will need to make sure the sequence is something like filetype.sequencenumber.fileformat - eg testfootage.1.jpg - having it as testfootage_001.jpg can cause some issues.

If you are using XSI remember that it is required first to change the playback speed to the correct fps (in my case PAL) as well as rotoscopy playback and size. Overall I found Maya easier to use for getting a preview as XSI did not render the background image plane on the default pass (as this is test footage currently I'm not splitting up passes till I have the camera moving smoothly with no slip).

I managed to get a smoother camera within Boujou when testing geometry in there but unfortunately I'm getting crashing issues when trying to export the sequence with the geometry within Boujou. In future I might just get some screen capture software to capture it.

Anyway I have a lot of work to do although it is coming up to Christmas so I'm going to take it a little easier and take the time to really learn the ins and outs of the program, maybe try some harder shots to match when I have become comfortable with the software again.

Motorbike II

No Comments »

Just a few more shots of the bike so far. I'm not too keen on the materials for the brakes currently but I'm just testing out lights and materials while I go do each step. Aiming to get started on the engine over the weekend and if I can put it on the bike for Monday.


Modelling Practise II

No Comments »

Currently still working on the car as well as some traditional digital art.
Something that I've always been keen on trying is a motorbike and I'm going to be modelling one (not this tutorial one) for my showreel (for motionmatching).

So far here is the frame I've done;


Just did a quick render with some blinns and FG using a similar lighting rig to my old FYP setup. Basically using grids with lamberts on and FG instead of using lights then having image based lighting on (without actually using it for lighting, just reflections).

I came across a big problem after trying out the Approximation editor (Window>Rendering Editors>Mental Ray> Approximation Editor). Basically used to show your geometry as smoothed out (as if you are pressing 3) without the need to convert to a subd or smooth deformer.

DBN 0.4 error 561001: invalid topology, object will not be tessellated
GAPM 0.4 warn 092001: tessellation empty for object "polySurfaceShape5"

This made the selected geometry (in this case the frame itself) invisible to any Mental Ray renders (but not with Maya Software)

After trying everything franticly (thinking I had not set up my materials correctly or Mental Ray itself) I had a search on some forums and found a fix that worked for me.

Mesh>Cleanup> Select Nonmanifold Geometry

This solved the issue and work resumed as normal. Before I finish my bike I'm going to check the geometry of each piece and make sure this doesn't happen for future renders. I'm glad I found the error now instead of when the end product even though it was quite frustrating and I hope if anyone has this issue themselves it will help them.

Modelling a Car WIP 2

No Comments »

Here's a bit more progress on the Car


As you can see I've nearly finished the base model. I'm going to be altering it and making space for the doors after it is done. I'm also currently working on the inner areas such as windosills and an area for the bonnet to rest. (For the rubber and metal Window fix they will be modelled separately so just added a little geometry so the body has no sharp edges).

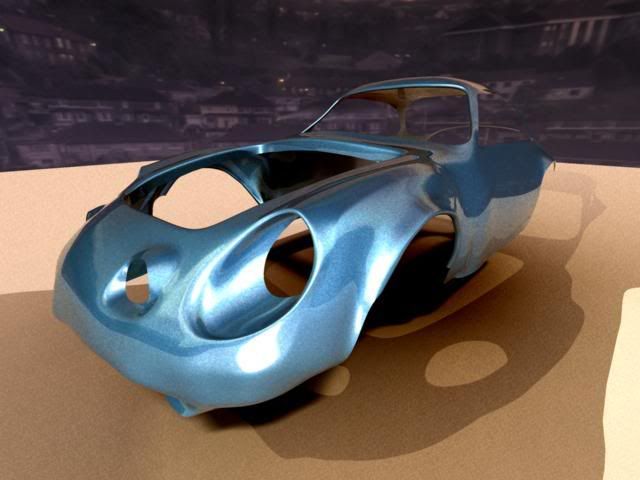
After a few days off and on of modelling (I work full time so until my weekend I only have an hour or so a night) I decided to mirror the geometry and take a little test render. Here is the result.


For this I tried out the Mental Ray car shader. Usually I build my own shaders and materials but have heard good things about the shader. I think after some more tweaking it will look ok for the body at least. Also instead of creating my own environment sphere I tried the Mental Ray HDRI image based lighting option in the render settings. I think I prefer having control over my own environment/reflection map and I still prefer creating my own light setups.

I added a little negative light inside the body just so the emphasis was on the exterior for now.
Overall I'm generally happy so far but can't wait till I start adding the details to it to break up the model.

After the base model is done I'm going to do bonnet/boot then start working on windows, lights and doors.

Modelling a Car WIP

No Comments »

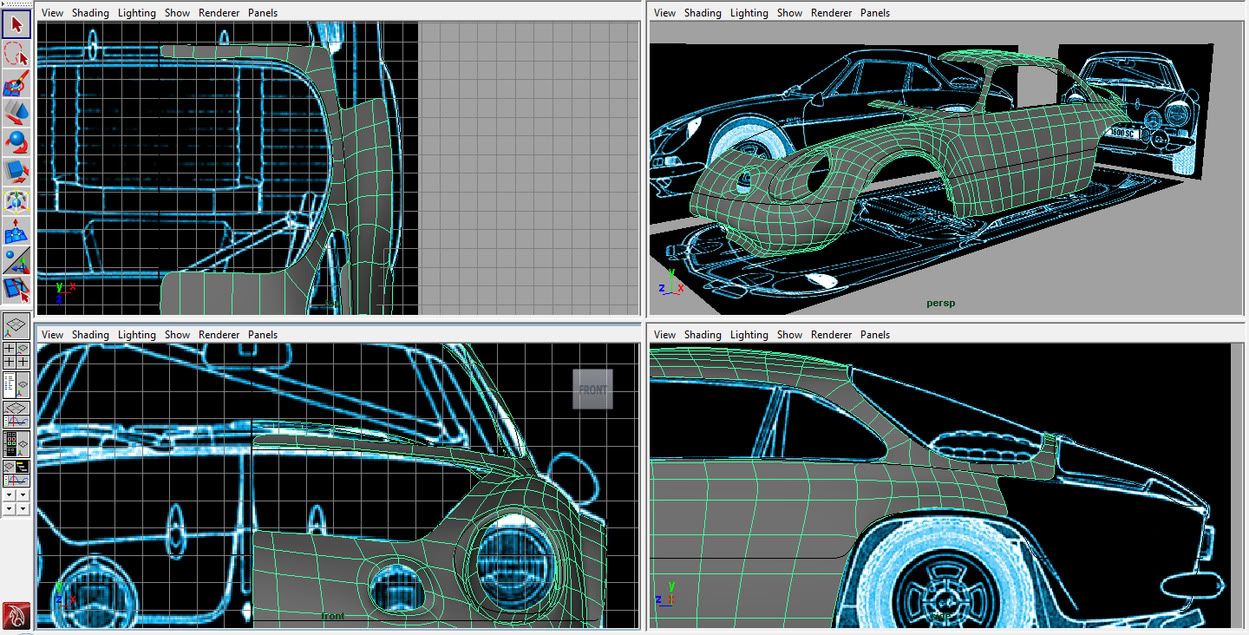
Currently I'm modelling a car (Alpine Renault 1600 SC) in Maya. I'm doing this to get back in to the habit of modelling and having a manageable project I can do on my laptop (my is still not ready yet).

I gave up on the outdated tutorials for box looking cars as I wanted particularly to do this car. It has a little character and also has a lot of nice fluid lines and contours.

I'm poly modelling it from reference (2d blueprints and I made some reference curves to so I can flesh it out/ keep the contours).

This is the first attempt at modelling a car and I'm finding it quite challenging but fun. I'm currently getting the basic body down, then going to work on other parts such as bonnet, trunk and windows. After that I'll redo the door and add lights and bumpers. Finally I'll start working on the interior (a very simple chair , wheel, dashboard) as well as tyres/wheels.

Here's my work in progress so far;

car wip1 car wip 2

car wip 3 car wip 4