Showing posts with label digital sculpting. Show all posts

September sculpts

No Comments »

Kicking in to overdrive and trying to sculpt as much as I can when I have free time. Here are a some of the sculpts done this month in my spare time;


I did this yesterday, trying to use a traditional method for creating a figure. Using a very simple armature created with zspheres then after posing using a standard sphere with dynamesh in order to sculpt over the top of the wire mesh. It was fine up until the point of adding the arms.

What I might do in future is append spheres separately for each ligament (and one for torso) then merge them after getting to a certain point as I was having some problems with the back/shoulder muscles. When it was all 1 mesh re-toplogising with dynamesh was causing that area to get even harder to fix.


I do like the posing and then sculpting asymmetrically. I think it adds a weight from the start which can be missing from the sculpture process, as well as possibly a more natural feel (not working in symmetry). I quickly concepted an orc/ogre from the base form I created which worked well.


Earlier in the month I was trying to work in different styles. After watching so many effects videos and prosthetics videos (the Stan Winston school vids on youtube are awesome!) I decided to go for a prosthetic/ mask style. Zbrush could be used to concept these ideas quickly before a mask/makeup was created. Below is an orc and goblin with this in mind.

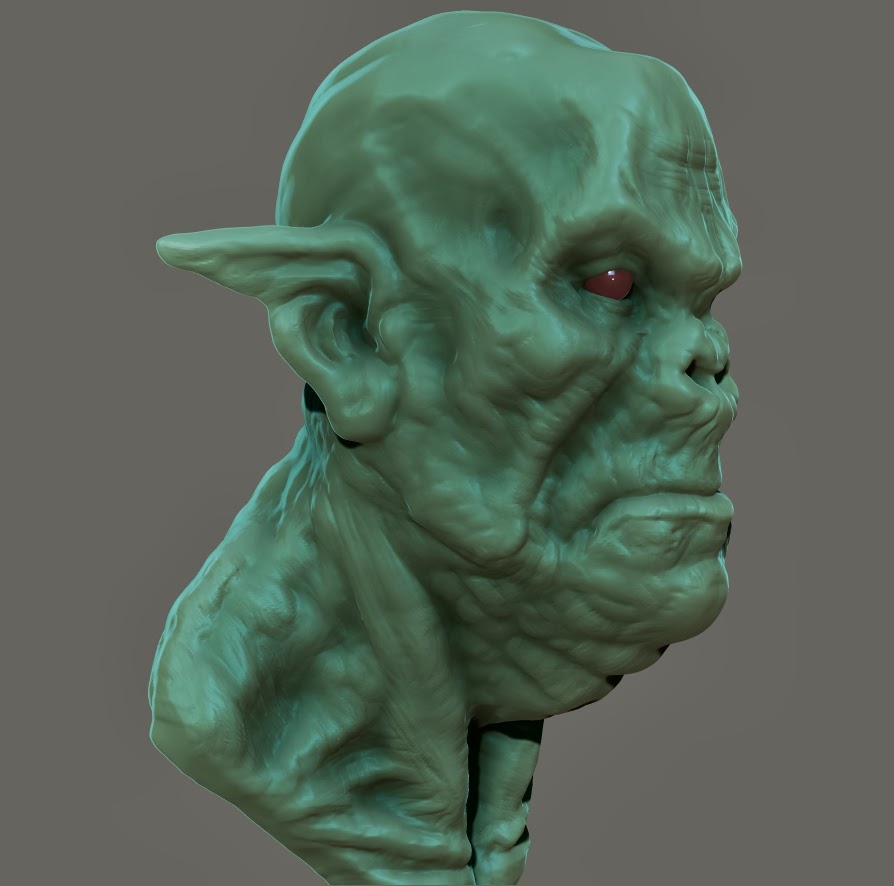

Below: Removing symmetry from the mesh and testing some ideas for the old orc.


Moving on with trying different styles I tried going for a highly stylised look. One of the weaker areas I have in zbrush (and 2d drawing) like a lot of beginners is the work can end up being a little 'soft' so tried to incorporate hard edges to help emphasis the 'thug' character.


Below: I wanted to just see how it would look like if I turned him in to the punisher/frank castle. I prefer the armoured look from punisher max and the most recent movie (the dude's not bulletproof!). This was done using extract mesh and imm curves


The alien head below was heavily based on Jordu's creature/mas work. This was a bust/head project to see if I could work a model over a number of sessions. I completed it over 3 sessions, then recorded it over 4 videos. The link is below the image (probably better to load in youtube itself to see all 4 parts).

Still a few days left in the month to try and get some more work on. I'm going back to Casey Love's SWS digital to practical lesson and trying some 2d concepting to try and increase my skills in building character and story within a character.


Sculptris: Ear practice and thoughts

No Comments »

Ok so here are a few of many done this week. For this week I only sculpted ears in Sculptris, with various references and starting points.

While I didn't exactly improve with it overnight I do think I've reached a point where I can at least add ears to a sculpt roughly, then be able to add detail as I go. The results of practise are below. Note some of these are really bad, and it's a learning process. I'm putting these up to hopefully give some people confidence that yes although they may suck they will get better over time!

 Test 1: This was my first attempt using a reference found on the net. I was using masks and getting pretty detailed too early on, making smaller adjustments pretty hard. The end result at least looks like an ear which isn't too bad!

 Test 2: This was actually following an ear modelling tutorial for maya. The first 5 minutes the guy explains the key lines in the ear so I tried to sculpt with an emphasis on the lines and curves. It was sculpted a little quicker than the first and the simpler style gives it a little flow. (Sculptris doesn't like too much masking or pushing geometry back in on itself, lesson to self remember to save!!)

 Test 3: This to me is a little step back but an experiment. I followed a clay sculpting step by step for a small toy head. It was 3 images next to each other and had the steps laid out above. It 'kinda' works in terms of exterior shape however it is stuck on to the side of the head and whereas in clay you could stick a palette knife behind and pull it out it can't be done easily in 3d sculpting.


The below test wasn't from reference but using the key areas from above. It was a 10 minute speed test just to see if I could make something with a start point so that from here a more detailed model could be made with the rest of the head.


Test 4: This was more about the characteristics of the ear to me, I used a regular standard brush to pull out the Tragus (the little knobbly bit on the right) and then a mound for the general ear. From there I used the standard brush on that mound to drag out the lobe and helix (helix is the curved bit at the top left/ the main arch). Doing it this way already pulled the ear out of the model and gave enough room to sculpt inside. A quick crease tool to extenuate some lines and emphasis on the lobe and it seemed to be ok.

I think the below test is my favourite. While not the most accurate it was the quickest with average results. It would fit in to the style of a more cartoony model which is fine and more detail can be added.

All of these (and all my sculpting in previous posts) has just been with a mouse for now (wacom on loan to a friend) so hopefully that should encourage others to try 3D sculpting!

Here are my thoughts on it all:

  • Practice! Keep at it and things do improve. Keeping a log is great to show before and afters. I have my first ever zbrush sculpts in the first or second post on here as a reminder.
  • I think that using reference is great for this however it can get easily confusing, the geometry just doesn't make sense when trying to convert it to 3d at times! Modelling it in a 3d package like maya may help give a sense of which bits are lower or higher in the ear extrusion itself.
  • To me after trying this it helps me realise that in a lot of sculpts the ear while an integral part of the head isn't that needed to nail as much as say the face. It is still important (particularly if basing a sculpt of another) but the 'feel' of the ear tends to be acceptable, especially if just doodling. It does improve your head sculpts even if basic, adding to the overall shape and feel of the model.
Finally I completely forgot to add this in a previous post but here is a very basic doodle in zbrush using a base mesh Danny Williams use. It was just a basic orc with a helmet but the mesh is a great starting point to practise some basic busts. Danny also sometimes runs seminars and lessons which hopefully one day I'll take!


First new Zbrush Tests

No Comments »

Finally got my hands on Zbrush again after 3-4 years. These are some of the first tests done testing dynamesh + Shadow box. Some of the notable editions are the insert features. I like the mannequin tool as well, hopefully to be the basis of some sculpts I'll work on.

Here are my first new tests done over the past day or 2.


 Above: The insert ears brush tested with dynamesh. While I will properly learn to do ears this is awesome for doodles/sketches!


Above: Playing around with Matcap shader options to create a hard plastic toy look
Below: Using the Curve pinch tool to emphasise hard edges along with the Hpolish brush. Shadow Box used for simple 'Jaw'


Sculptris: Sagat WIP

No Comments »

Done this evening, sculpted from a sphere in Sculptris. Going to add ears soon!


Below: Some earlier work in progress. Decided to go for a more characterized look with the pose


Sculptris: Daredevil

No Comments »

Having a few PC problems at the moment so this took a bit longer than it should have (need to buy new bits to stop it crashing!)

Anyway this was done in an evening from a sphere in sculptris. Rendered in sculptris as well (tried multiple materials and masks to emulate passes, see previous tutorial post on technique used).


In paint mode I also used multiple materials with different masks to give a different material type for the skin and eyes. It can be a bit fiddly but it works ok now!

Sculptris statue: Colossus part 3 - the Head tests

No Comments »

Still working on this but I've started to work on the head and test some face shapes.

I started out with an extremely simple (it ended up being a little too simple) basemesh composed out of a cube with 2 extractions.

I was hoping the cube structure would make it simple to convert to Colossus' head from this but I didn't even add proper proportions and after smoothing it went a bit wrong so pretty much ended up smoothing it in to a flat faced sphere and built the face then rounded it after.


I tried to use the flatten took particularly on hairline, eyebrow 'mounds', cheekbones and nose just to get his cubic feel. He looks a bit like a 40 year old version of Colossus but this is the first test so I'm pretty happy with it.

After doing this I thought I'd test a pose using the 3 sculpts created. The idea I had was maybe him leaning in to bust down a wall/door or having 1 arm up in defense while holding off others to protect them. sculptris is good as you can add other scene files as shown before to test different poses and such. The image below works out at about 215k polys and there were no crashing problems so far which is great!

Sculptris: Chest from imported model wip

No Comments »

Carrying on with the previous tutorial theme I made a simple cube in Maya then moved the vertexes in to the shape below. I DELETED HISTORY then this time as my model was already Quadrangulated I thought I'd see what it was like to import straight in to sculptris as an OBJ, it worked!


Here's what I ended up sculpting using that base mesh;


I then added the arm created in the previous scene just to see how it looked and it didn't look too bad! I've decided I'm going to work on a sculpt of Colossus from x-men so this is a good example/practise shot!


I changed my material to a metallic one then instead of using the crease tools for the lines (which would have upped the triangle count substantially) I went to paint mode with both objects and painted an inverted bump. Hopefully I'll refine/neaten this technique when I start to work on the proper model!

All in all this took about 30-40 minutes so I think it is really good for concept modelling. Give it a go! (remember you wont really be able to use these for games or animation, adding multiple items can be a bit of a bodge job like the arms but no harm if just for fun/ one particular angle!)


Update above!: Just tested out meshmixer07 another free piece of software to extrude parts of the mesh to make the clothing to test it. Just a quick painting test will work more with both packages properly soon!

Sculptris Tests

No Comments »

Sculptris is currently a free to use 3d sculpting program (currently in Alpha stage). It is slightly more basic and raw compared to the big sculpting tools (mudbox/Zbrush) but it still has a great charm and excellent ease of use.


Here are a few tests done with it (using the default sphere as the starting point).

Above: test/wip work of a Magneto/ Raiden character (head would be covered with helmet)
Below: A goblin


Above: WIP of a Kingpin style character
Below: Test Render in Maya with bump and skin shader applied


I found the program really easy to use and a nice start for those not used to importing objects in to Maya for a render. (I used a modified version of MayaSSS Fast Skin Shader as a base for the skin with my texture painted colours as bump added to it, then a simple lighting rig for the images). The downside is it's quite a bit harder to get a refined model such as in zbrush and poly count can be quite high (although the reduce brush does an excellent job of lowering poly count).

This program is perfect for lunch time doodles at work or test ideas which can then be developed in more powerful software combinations. Give it a go!


Zbrush doodling - Ork

No Comments »

I've been following some simple tutorials online on how to create a macro in Zbrush which allows you to create a good base sphere to start modelling/ doodling on. It is called a 'Squirkle' I'm sure if you google it you will find the same or similar tutorials.

Following the recommendation of experienced Zbrush artists I have started 'doodling' with just the move, clay, standard and smooth (as standard as possible) brushes. This is simply because I'd rather learn each tool properly and to a good level before I start flying off the handle with snakehook, stitch and track brushes. I've found the move tool invaluable and the main tool to use until you feel you can sculpt from the base shape of the model.


Here is a step by step look at the Ork head I created (based on the Games Workshop models), currently without teeth and eyes (which will be added once the subtools system has been learned fully).


After changing the material and doing some rough shades of skin and highlighting in Zbrush I took it in to Photoshop to add a little more detail such as drawing eyes and adding a little more shading/highlighting to the skin. The result can be seen below;


I have the teeth, eyes and ears to work on still but I'm going to practice ears and maybe fill a whole post just on my 3D study of them with my WIP/sketches. In the next few days I'll also be posting some of the photography I did over the past month.

Thanks for reading as always.