Archive for November 2012

Sculptris: Lunch Crunch 1 hour Torso Study

No Comments »

This was the first time I've limited myself timewise for a sculpt. I set aside 1 hour of my day to just focus on sculpting. I initially didn't like the idea of doing speed sculpts or similar (after always seeing the end result from artists it's very easy to feel you mayswell not try with some of the talent out there).

But after watching a webinar by Danny Williams regarding the reasons behind doing a limited time study (He uses the term Lunch Crunch and there is now a community based around this study ethos found here http://www.facebook.com/groups/lunchcrunch/). It really does allow you to focus on the task. I could prepare my references and for that hour just get something done.

Here are my results. This was done in Sculptris (see the image below).


  I used 3 spheres, 1 for the abdomen, chest and shoulders. To add new objects in sculptris just go to Add Sphere > Add object. It will automatically mask out the other objects in the scene so you can get a basic shape. After getting the basic shape just using grab I remove all masks in the scene by ctrl+click dragging anywhere outside of the object. Originally I used to just make everything from 1 model in sculptris thinking blending wouldn't really work as you might get with a dynamesh but the results aren't terrible.


Above: Click for full view

Using a clay brush you can go around the visible seams and it will give the effect of blending the object. The great news is though that your individual objects can still be hidden (h+click on the object you want to hide). Also if you want to mask individual objects again just add another sphere to the scene. It will let you seperate them again for more detail if needed.

For rendering the sidebysides and turntable I just used GoZ to take it in to Zbrush. From here I added a custom material (I like the cavities to be visible in best and regular movement). To make it one object I just used Dynamesh and set the res to about 500 (Really not needed for this low detail model but it was just for a quick render). I also used claypolish>Edge 5 then re dynameshed just to get rid of a little artifacting which will happen when moving stuff from sculptris to zbrush.


I really recommend people giving this a go anyway! You don't have to upload everything as nodoubt some days will be better than others but render it off anyway just to see progress being made! 

I intend to keep this up as we can all spare 1 hour in the week at some point! It's funny as I seem to have got more done dedicating just 1 hour so far than if I hadn't but had my sculpting programs open for hours.

Zbrush: Dynamic pose tests

1 Comment »


This week I've been setting some time aside to practice some Dynamic poses for full figures. I've always wanted to progress my sculpting to the level of working on a comic or pop art statue (maybe get it 3d Printed when I'm at a good enough level).

I'll probably be getting some real armature rigs set up for testing (as I'm dying to test real clay, so many great influences such as the Shiflett Brothers) in the meantime I took advantage of the Mannequin tools in Zbrush 4 and above (might even be in 3!)

These are very simple to move around and duplicate so good to give a basic idea of shape and form. It is great for prototyping shapes (particularly if you have a basic idea in mind). I also found that it provided a fun puzzle when using comic references to see where all the hidden limbs go while still feeling dynamic and fluid!


Above: This was the first test, I wasn't using reference and didn't really have an idea but it ended up looking a little by a stiff arm done by an American footballer, this was also to test adding basic objects to the scene.

 Below: The first comic based test. This was intended to be Batman and Robin. I was trying to work off a silver age batman image in which he is throwing a Baterang. These classic throw poses always have great curves but in 3D it looks a little awkward. With the cape though if I added one I think it would add to the overall curves and flows of the object.


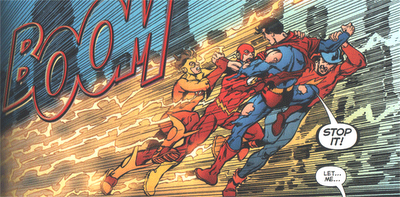
Below was a test from a comic panel from the Infinite Crisis, in which 3 Generations of flash try to take Superboy Prime in to the speedforce. Here is the panel I got the main reference from (also checked out general 100m sprint poses;

http://photos1.blogger.com/blogger/2238/2450/400/flashes.0.png


Finally, I always wanted to see a Captain America statue where he dives through a window or similar, this made me think about how to make something which could potentially be supported if I made a physical sculpt/print of it. So here I worked with that in mind and have him diving in to a load of Hydra agents (I'd probably add one or 2 more). 


This is my favourite as it's the statue/pose I've been thinking about before this task. I'm thinking of taking this forward as a custom sculpt as although it contains a lot of models all Hydra agents look the same! Now I have the base for the shape and form I could work on the models separately then bring them in to a new scene allowing for a little more control.


Over the Cork Jazz Weekend: 26-29th oct

No Comments »

I took my camera out over the Jazz weekend in a hope to take some photos of the various musicians over the famous weekend. However, I've never seen the place so busy! We couldn't even see the acts we were listening to most of the time, sometimes being relegated to the smoking/beer garden.

Still it was a great weekend as always and it didn't stop me taking photos!

D7000 - 35mm 1.8


Above: Lovely sunsets on the Saturday of the weekend. The river Lee


Above: This is White Street Car Park. Filled with lots of graffiti/street art (literally fills the whole car park). This is just a corner of it! Well worth a look if you are in cork sometime.

Below: The 2 shots below were just a test/idea which work in a busy area. Portraits through a pint glass. You get some pretty cool effects depending on the glass, just make sure you have that in focus! (I might do more of these/ a whole post on them).


Below (and above): These 3 shots were all taken at the Franciscan Well pub. There was a beer festival on at the same time as the Jazz Weekend. It was also packed here! I love the choice of beers they have there normally but when the beer fest is on there are so many to choose from! These were taken at ISO 1600 f2.8


Some short tips of low light/evening photography:

  • Don't be afraid of higher ISOs - modern cameras handle high ISO pretty well, most cameras now will do at least ISO1600 perfectly fine (even 3200 and above are acceptable). When you zoom in with lightroom or another package you're of course going to see noise, don't let this put you off shooting. The noise does add a warmth to some images, and in black and white it works well.
  • Use the light available to you - I personally don't tend to carry my flashgun around with me if just going out with a few friends, let the lights in the area you're shooting direct where you take your shots. 
  • Steady your shots with the environment - For the cityscape shot it was still relatively low light to get 3 exposures (I was at ISO250 f4) so shutter speeds were slow. For these I just wedged the camera in to the bridge I was stood on to ensure it was steadied. For pub/indoor shots, leaning against a wall or leaning on tables/ bars will help you steady the shot if you hold your camera tightly (see the previous post for steady /low shutter speed camera handling)

Fota Wildlife Park: Black and White

1 Comment »

These were taken on Tuesday 30th Oct at Fota Wildlife Park. I've been there plenty times before as it's a great day out for all and there are some awesome animals walking in and around the park!

It was extremely cold that day so a lot of the animals were keeping warm indoors however I managed to take a few for a series of Black and White shots. Click for larger view!

D7000 - Tamron 70-300mm lens


Above: Cheetah on the prowl
Below: Emus are probably one of my favourite large birds. They have a great call which is a really bassy style click (kind of like a super slow mo dubstep version of roadrunner's sound). They love to pose as well!


Below: Ostriches are also great birds, pretty elegant when striding along. These, along with the Emus in the park tend to walk nearest the fence so you can get nice and close to them to take some detailed shots.


 Above: I probably have the species wrong here (tip! Do your research while at the park, plenty of information stands and people around to help!) but I think this is a Grey Crested/cheeked Mangabey?. Shooting monkeys or apes can be tricky depending on the time of day. You need a lot of patience and a steady hand. If they are moving try to predict their next climbing location and set up for that using the posts/ trees that are near.


Above: Close up of a European Buffalo horn. These guys are huge. No matter how many times I've been these have always been side on to where you walk so thought I'd try shooting different key parts of the animal. This provided the best mix of tones and textures! 

Here are a few tips when shooting wildlife, these can be used in a park like this (I recommend if you live in or near Cork to go by the way!) or out in the wild.

  • Be patient - animals are not always active, use the time to plan a shot for when they do move. Also look at the shapes of the animals if they are static. For example, the buffalo was just lying down so I just shot a part of it which I may not have been able to if the animal was moving. Another tip is to find out when feeding times are or walk along with one of the park rangers. Wildlife park animals may move/wake up when they hear the walkie talkie going as there may be a possibility of food!
  • Prepare your shots - while animals are unpredictable they will still follow a certain path most of the times. Grazing animals will tend to follow the rest of the herd so wait and see where the leader of the herd goes and set up there. While a faster lens may help most the time get that quick shot it isn't impossible with a slower or cheaper lens. I use a very cheap/old 70-300 (probably under £100 now) and am still able to get some good shots in relatively overcast light (I was shooting at mostly f7.1 to f8)
  • Hold your camera tight! - we all think we're doing this all the time, then daren't go below 1/160 for fear of blurring. I've recently been really paying attention to camera holding techniques and can now go down to maybe 1/40 without getting too much blur. To do this hold your camera with your left hand cupped under the lens but pushing to the right, then counter this by gripping with your right hand but pushing left. Finally press the eyepiece tightly in so there is some pressure on your eyebrow/forehead. This dramatically reduces camera shake (remember to tuck your elbow in as well!) It can take some practice though and feel uncomfortable but will reduce blur!